) “Whip up a warm loaf of campfire bread in minutes
Buckle up, folks! I have a recipe that I know you’ll love. It’s time to try something new, something that will take your camping game to the next level: Coffee Can Campfire Bread! Yes, you heard it right – this bread is baked in a coffee can over a campfire. It’s a fun and less labor-intensive way to bake bread and impress your camping companions at the same time.
There’s nothing better than freshly baked bread that fills the campsite with its warm and inviting aroma. It’s the perfect comfort food for chilly nights around the fire pit. And with this recipe, you can enjoy baked bread without needing any fancy equipment or a fully stocked kitchen.
I know what you might be thinking – heating up a coffee can over an open fire sounds dangerous. But trust me, I’ve made this bread many times before and it’s safe as long as you follow the instructions. The recipe only requires a few simple ingredients and minimum effort to prepare. So why not give it a try? Let’s get started.
Why You’ll Love This Recipe
Picture this: you’re out in the great outdoors, surrounded by tall trees and fresh air, and you’ve worked up a hunger that only something warm and comforting can satisfy. You could settle for mundane trail mix or boring sandwiches, but why not elevate your camping experience with some freshly baked bread straight from the campfire? That’s where my coffee can campfire bread recipe comes in.
You’ll love this recipe for several reasons. First of all, it’s a fun and unique way to bake bread without any fancy equipment. Forget about the tedious kneading process and just boil your bread dough directly in a coffee can over an open flame. It’s less labor-intensive, but just as impressive as any dutch oven bread you’ve ever made.
But that’s not all – this recipe is also incredibly versatile. You can keep it simple and make a classic raisin bread or pumpkin bread, or get creative with different flavors like cinnamon, nutmeg, or even chocolate chips. The possibilities are endless!
And let’s not forget about the taste. The bread turns out perfectly moist and chewy on the inside with a crispy crust on the outside. Plus, there’s nothing quite like the aroma of freshly baked bread wafting through your campsite to attract some envy from your camping companions.
So whether you’re an experienced camper or just starting out, this coffee can campfire bread recipe is a fun and easy way to impress your fellow campers and elevate your camping meals. Try it out and see for yourself why this recipe is definitely worth adding to your camping hacks repertoire.
Ingredient List
Before we get started on this fun and easy coffee can campfire bread recipe, let’s gather all of our ingredients first. With simple ingredients that anyone can find at home, we can make a freshly baked bread that will impress our camping companions in no time. Here are the ingredients you’ll need:
Coffee Can Campfire Bread Recipe Ingredients:
- 1 cup warm water
- 1 package dry yeast (or 2 and 1/4 teaspoons)
- 1 tablespoon sugar
- 1 teaspoon salt
- 3 cups bread flour
- Cooking spray
- Butter, for greasing the cans
- Flour, for dusting the cans
- Aluminum foil
For those who are bringing their own camping supplies, don’t forget about carrying small coffee cans that will serve as our bread tins. If not, don’t worry — baking bread in a Dutch oven or a cast iron skillet works like a charm as well.
The Recipe How-To
Now it’s time to get to the fun part – making your coffee can campfire bread! Gather all the ingredients and let’s get started.
Step 1: Prep the Coffee Cans
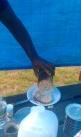
First things first, you want to make sure your coffee cans are clean and dry. Cut a piece of aluminum foil into a square big enough to cover the inside of the can, then butter it or spray it with cooking spray. This will ensure your bread doesn’t stick to the can when baking.
Step 2: Activate Your Yeast
In a small bowl, combine 1 cup warm water with 2 1/4 teaspoons dry yeast, and stir gently with a fork until dissolved. Let the mixture sit for about 5 minutes until it becomes foamy on top – this means your yeast is activated.
Step 3: Mix Your Dough
Now, in a large bowl, mix together 5 cups of flour, 1 tablespoon salt, and 1/2 cup sugar. Then add your foamy yeast mixture and 1 stick melted butter. Stir everything together until it forms a shaggy dough.
Step 4: Knead and Rise
Turn out your dough onto a floured surface and knead for about 10 minutes until smooth and elastic. Place the dough back into the bowl, cover with a clean towel or plastic wrap, and allow it to rise in a warm place for about an hour, or until doubled in size.
Step 5: Fill Your Coffee Cans
Once your dough has risen, punch it down and divide it into two equal parts. Roll each half into a ball and place them into your prepared coffee cans. Cover with aluminum foil and place them near the firepit or into a dutch oven over hot coals.
Step 6: Bake Your Bread
Now comes the fun part – baking! If you’re using coffee cans, place them on top of hot coals around the edge of the firepit so they cook evenly. Rotate them regularly to cook both sides equally – this should take about 30-40 minutes in total.
If you’re baking in a dutch oven, place your covered pot onto some coals with some extra hot coals placed on top of the lid to help with even cooking – this should take around an hour but keep checking every so often.
Step 7: Enjoy!
The hardest part is waiting for your freshly baked bread to cool before slicing into it. But once you do, enjoy it warm with some pumpkin butter, honey, or jam. You’ll impress all your camping companions with this fun and easy coffee can campfire bread recipe!
Substitutions and Variations
When it comes to making campfire bread, there is room for creativity and experimentation. While the classic version of campfire bread is made with coffee cans and raisin bread ingredients, you can switch things up to suit your preferences or the ingredients you have available. Here are a few ideas to get you started:
– Butter: If you don’t have butter on hand, you can use oil or margarine instead. Keep in mind that this may slightly affect the taste and texture of the bread.
– Coffee Can: If you can’t find small coffee cans, try using large ones or other metal containers. Just make sure they are sturdy enough to be placed over a fire.
– Yeast: If you don’t have dry yeast, substitute an equal amount of fresh yeast instead.
– Raisin Bread: While raisin bread adds a nice touch of sweetness to the bread, feel free to experiment with different types of bread. Try using pumpkin bread for a fall-inspired treat or even plain white bread.
– Cast Iron Dutch Oven: If you’re not keen on using coffee cans, use a cast iron Dutch oven instead. It will create similar results and you won’t have to worry about finding cans.
– Add-ins: Make your campfire bread unique by stirring in chopped nuts (pecans would be great), shredded cheese, diced apples or dried cranberries into the dough for an extra burst of flavor.
These substitutions and variations are just some ideas to inspire your inner chef, so don’t be afraid to get creative with your campfire cooking. This fun and easy recipe is all about enjoying food com fun less labor-intensive way – perfect for impressing your camping companions next time you spend some time around the fire pit.
Serving and Pairing
Once you’re finished baking your delicious coffee can campfire bread, the next step is to serve it alongside your favorite food or drink. Personally, I find that this bread goes incredibly well with hot and creamy butter. Once you spread a generous amount of butter on each slice, the warm and fluffy bread will simply melt in your mouth.
If you’re camping with friends or family, this bread is a great addition to any meal. You can serve it as a side dish to your main course, or even make it the star of the show by pairing it with some soup or salad. The bread’s flavor profile also pairs well with cheese and meat-based dishes.
For those who prefer a sweeter taste, spread some peanut butter or strawberry jam on top of the slices for an extra treat. The sweetness of the jam along with the warm, baked texture of the bread creates a symphony for your taste buds that you just can’t resist.
Finally, consider packing some freshly sliced vegetables such as carrots and cucumbers along with some hummus and enjoy them with the delicious coffee can campfire bread. It makes a nutritious and filling snack that everyone will love on your camping trip.
Whatever way you decide to serve this delightful bread recipe, one thing is for sure- it’s bound to impress your camping companions every time!
Make-Ahead, Storing and Reheating
As a barista and avid camper, I understand the importance of convenience in outdoor cooking. With my coffee can campfire bread recipe, you can prepare the dough ahead of time and store it in an airtight container for up to a week in the fridge.
When you’re ready to bake, simply remove the dough from the container and let it rest at room temperature for about an hour. Preheat your oven, or better yet, your campfire pit or cast iron Dutch oven, and follow the baking instructions as previously stated.
Store any leftover bread in an airtight container at room temperature for up to three days. To reheat, simply place slices on a baking sheet and heat in a preheated oven at 350°F for 5-7 minutes until warmed through. You can also toast slices in a toaster or over an open flame for that freshly baked taste on your next camping trip.
A helpful tip: if you plan on serving this bread alongside a savory meal, consider leaving out the sugar and raisins from the recipe for a more neutral flavor profile that complements various flavors. This hack will come in handy when camping with picky eaters who appreciate some diversity on their plate.
In summary, with proper storage techniques and reheating instructions, you can enjoy freshly baked coffee can campfire bread even after your outdoor adventure has ended.
Tips for Perfect Results
As a seasoned barista and avid campfire cook, I’ve learned a few tricks of the trade when it comes to making the perfect coffee can campfire bread. Here are some tips to help you achieve delicious, freshly baked bread while camping:
Firstly, make sure to use warm water when activating the dry yeast. The yeast needs warmth to activate, so if the water is too cold, it will have trouble doing its job. On the other hand, if the water is too hot, it will kill the yeast. Aim for a temperature between 110-115°F for optimal results.
Secondly, don’t be afraid to get creative with your flavors! While this recipe calls for raisin bread, you can swap it out for pumpkin bread or even add in some savory herbs like rosemary and thyme. The possibilities are endless.
Next, prepare your coffee cans properly by coating them with cooking spray and lining them with aluminum foil. This will prevent the bread from sticking and ensure the dough cooks evenly.
When placing your coffee cans in the fire pit or dutch oven, make sure they are not touching each other or the sides of the container. This allows for proper air flow and prevents uneven cooking.
Additionally, check on your bread often while it’s cooking to ensure it doesn’t burn. Every fire pit or campfire is different, so keeping an eye on your bread is crucial for preventing any mishaps.
Once your bread is done cooking, let it cool before removing from the can. This allows for even more airflow and prevents any burnt areas from sticking to the aluminum foil.
Finally, don’t forget the butter! There’s nothing quite like slathering freshly baked campfire bread with a generous amount of butter. It adds an extra layer of flavor and richness that complements the smoky taste of campfire cooking perfectly.
By keeping these tips in mind, you’ll be able to impress your camping companions every time with delicious and impressive campfire bread that requires minimal effort but yields fantastic results.
FAQ
As we approach the end of this recipe article, you may have some questions. In this section, I will address the most frequently asked questions about making campfire coffee bread in coffee cans. So, grab a cup of coffee and let’s get those burning questions answered!
How do you cook in a tin can campfire?
In this recipe, we will be making a Tin Can Campfire Meal. To start off, neatly layer the ingredients in a can, beginning with the hamburger. Make sure the can is tightly covered with aluminum foil to keep everything secure. Then, pack the can into a cooler until cooking time. When ready to cook, place the can in a medium hot area of your campfire and let it cook for approximately 45 minutes.
Is boiled bread a thing?
There’s nothing quite like a perfectly boiled bread, like a freshly baked bagel or pretzel. They have a chewy texture that makes each bite last longer and a shining appearance that signals their delicious, yeasty flavor. Achieving this kind of quality, homemade boiled bread is worth the extra effort and time it takes.
Bottom Line
In conclusion, the Coffee Can Campfire Bread Recipe is a must-try for any camping enthusiast or baking enthusiast out there. This recipe allows for a fun and easy way to bake bread that is less labor-intensive than other traditional methods. With its simple ingredients and convenient baking technique, this recipe will leave you with freshly baked bread that is sure to impress your camping companions every time.
So next time you’re out camping or looking for a fun and unique way to bake bread, give this recipe a try! Whether you use a coffee can or a dutch oven, this recipe will provide you with delicious results that are sure to satisfy your taste buds. So butter up a slice of warm campfire bread and enjoy the ultimate campfire cooking experience!
Coffee Can Campfire Bread Recipe
This a fun and less labor-intensive way to bake bread and impress your camping companions at the same time. Adapted from Sam on About.com.
- 1 lb bread dough
- 5 tablespoons butter or 5 tablespoons cooking spray
- Also requires 1 small coffee can and 1 large coffee can.
- Grease and coat the small coffee can liberally with the butter or cooking spray.
- Place dough in can and cover with foil. Place in warm area, perhaps on the ashes of the outskirts of a campfire until dough rises, until almost doubled in volume.
- Line the bottom of the large can with about 1 or 2 inchs of pebbles, small rocks or sand to keep the bread from burning on the bottom. Set the small can inside the large one, making sure the sides don’t touch, and then insert the large can into the coals, burying about two or three inches of the bottom. Cover the entire top with foil and poke a few holes to allow air. Check by lifting foil in about 40 to 50 minutes. Bread is done when brown on top.
- Feel free to use different kinds of bread dough. I used a pound of wheat dough mixed in my bread machine.
[custom-related-posts title=”Recommended Recipes Just For You” none_text=”None found” order_by=”date” order=”ASC”]