Fluffy and Delicious: Learn How to Make White Bread
Imagine the smell of freshly baked bread wafting through your kitchen, a scent so warm and inviting it could bring anyone to the table. Now imagine that bread being baked in a coffee can – an unusual but classic cooking method that produces a light and airy loaf with a golden brown crust.
This white bread baked in a coffee can recipe is a unique spin on traditional homemade bread. The method may seem unconventional, but the results are truly exceptional. This recipe combines the best of both worlds by using a soda-leavened quick bread technique while still producing a classic, crusty homemade bread.
Baking in coffee cans is an unusual cooking method that conjures up memories of old-fashioned home baking. The technique was popular in the 1950s when baking in standard loaf pans was not possible for many families due to their limited availability.
This recipe is perfect for those who want to experience the nostalgia of homemade bread baked in coffee cans or those who simply want to try something new and exciting in their baking routine.
Whether you’re an experienced baker or new to the game, this white bread baked in a coffee can recipe is sure to impress. It’s easy to make, produces delicious results, and provides a unique twist on traditional homemade bread recipes. So let’s get started with this baking adventure!
Why You’ll Love This Recipe
You might be thinking that making homemade bread is a long and complex process. But what if I told you that this White Bread Baked in a Coffee Can recipe is simple, quick, and produces delicious, crusty bread every time? Trust me, you’ll love this recipe! Here’s why:
Firstly, this recipe is extremely versatile. You can make it with just a few basic ingredients that you probably already have in your pantry: flour, yeast, sugar, salt, milk, water, and eggs. This means that you don’t have to go out of your way to buy expensive or exotic ingredients. All-purpose flour works perfectly fine!
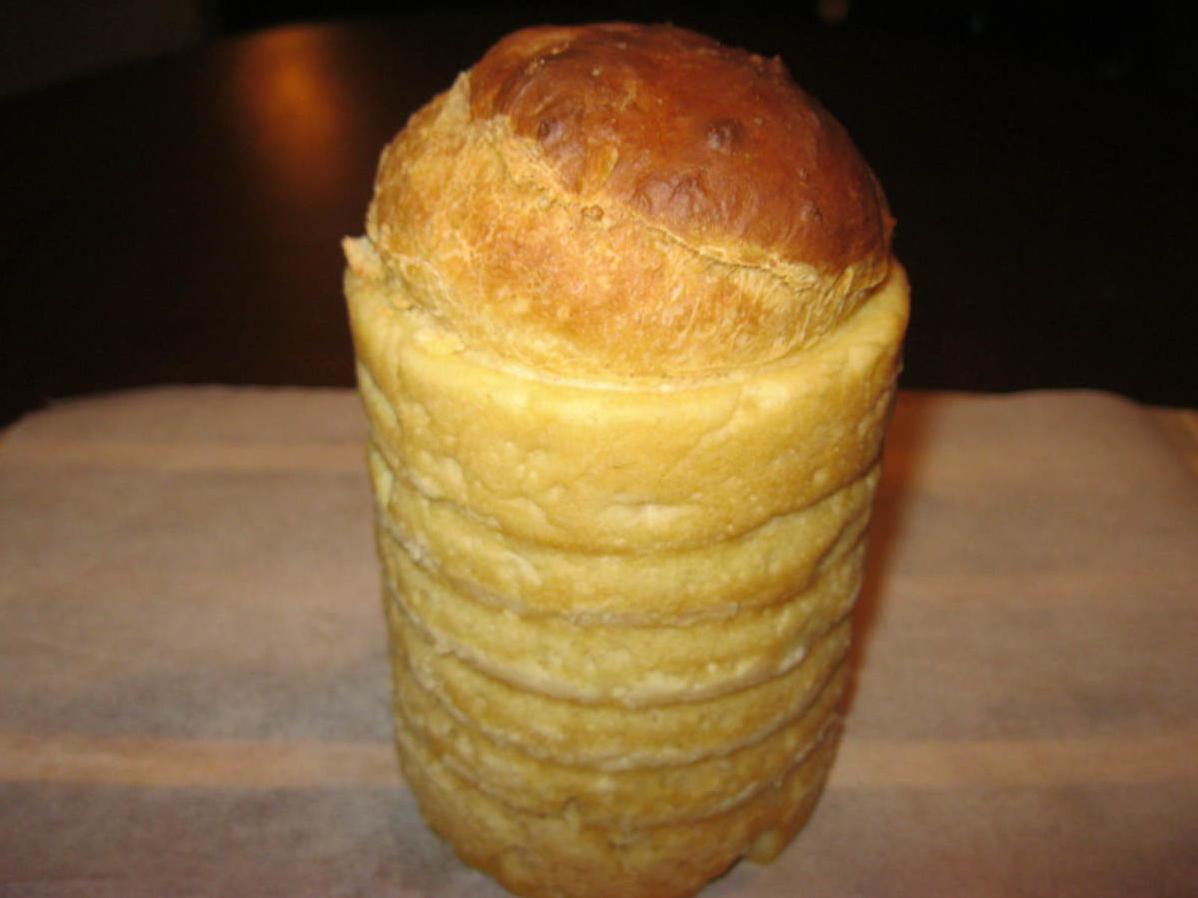
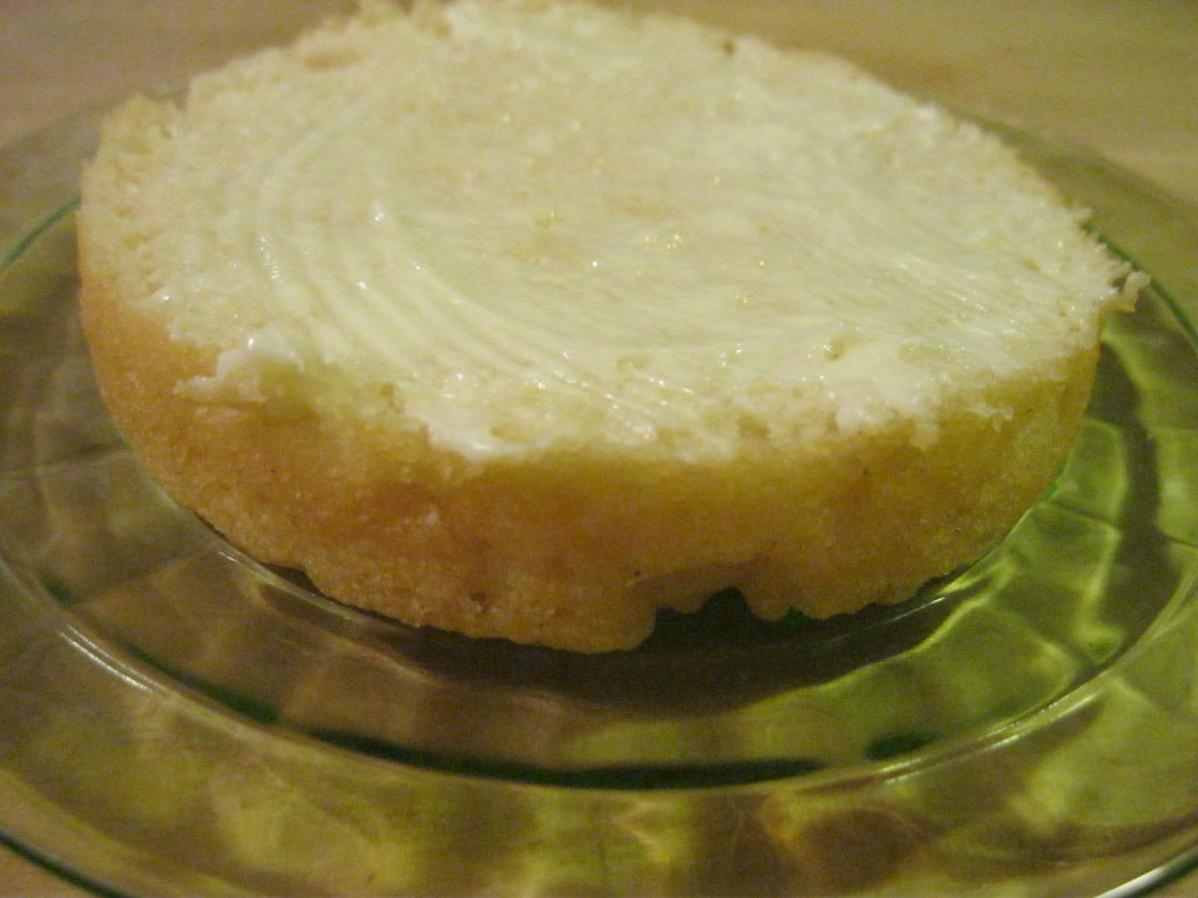
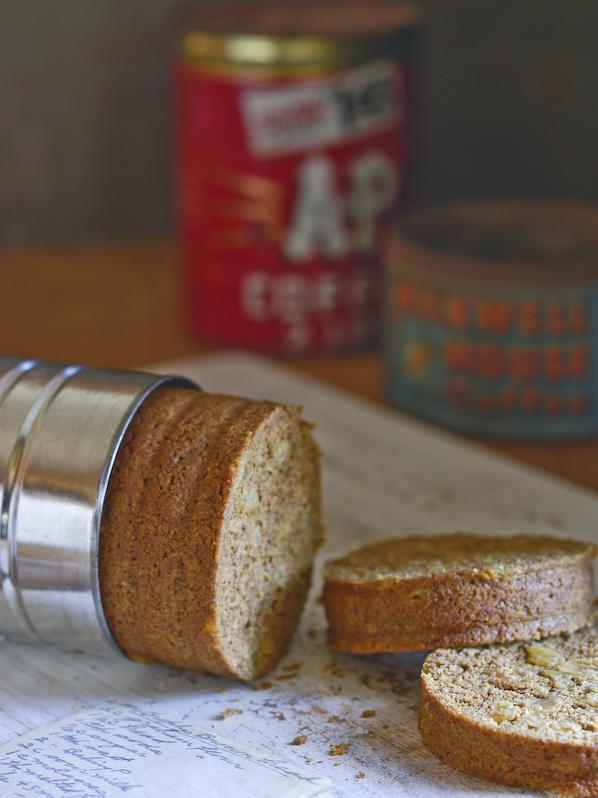
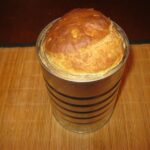
Secondly, baking this bread in coffee cans gives it an unusual shape and texture. It’s not your typical loaf pan bread. Plus, using coffee cans prevents the dough from spreading out too much during baking, resulting in a lighter, fluffier texture.
Thirdly, the coffee cans themselves serve as convenient baking vessels: they’re the perfect size for 1 pound loaves of bread and provide even heating throughout the baking process.
Finally, this White Bread Baked in a Coffee Can recipe is easy to customize to suit your preferences. If you prefer brown bread over white bread just substitute some or all of the white flour with whole wheat or rye flour depending on your taste – this would create a Boston Brown Bread type flavor. Furthermore; if you want a sweeter loaf just add more sugar or honey to the dough when mixing together. You can even add seeds or nuts on top of the dough before baking to make it even more flavorful.
Overall, there are so many reasons why you’ll love this White Bread Baked in a Coffee Can recipe! It’s easy to make with minimal fuss and delivers great results every time. Give it a try today!
Ingredient List
Here is the ingredient list you will need to make this delicious white bread baked in a coffee can recipe:
- 1 1/2 cups warm water (110-115°F)
- 2 tbsp sugar
- 1 tbsp active dry yeast
- 2 tbsp salt
- 1 cup milk, scalded and cooled to lukewarm
- 2 eggs, beaten
- 1/2 cup sugar
- 7-8 cups all-purpose flour
- cooking spray for greasing the cans
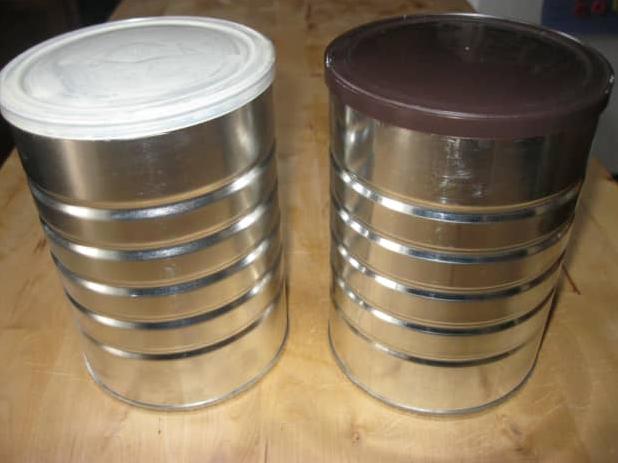
You will also need two well-greased 1-pound coffee cans to bake the bread.
The Recipe How-To
Now the fun part begins! Here’s how to make white bread baked in a coffee can:
Step 1: Preparing the Yeast Mixture
In a large bowl, dissolve 2 tbsp sugar in 1/2 cup warm water. Add a packet of active dry yeast and let it sit for about 10 minutes or until it becomes bubbly.
Step 2: Mixing the Ingredients
Add 4 cups flour, 1 tsp salt, and 1 cup milk to the yeast mixture, stirring well until everything is mixed together. Then, add 2 well-greased 1 pound coffee cans covered with cooking spray.
Step 3: Letting the Dough Rise
Cover both cans with cling film and let them rise until they double in size. This will take approximately an hour.
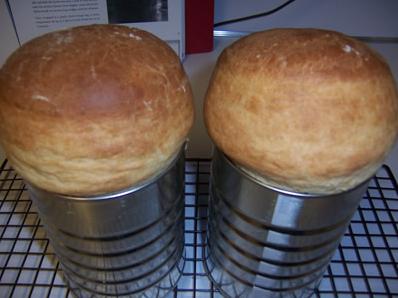
Step 4: Baking the Bread
Preheat your oven to 350°F. Once preheated, place both cans in the oven and bake for approximately 45 minutes or until golden brown. Insert a toothpick into the center of the bread; if it comes out clean, your coffee bread is done!
Step 5: Cooling and Serving
Remove your baked coffee cans from the oven and let them cool on a wire rack. Once cooled to room temperature, gently shake each can to release the bread.
Step 6: Optional Toasting
If you prefer a lighter, fluffier texture for your bread, you may wish to toast it before serving. Simply slice it up as desired and warm it under a broiler or in a toaster.
Enjoy the homemade goodness of white velvet batter bread baked in coffee cans any time you like!
Substitutions and Variations

There are plenty of substitutions and variations you can incorporate to make this coffee bread recipe your own! If you’d like to switch things up, here are some simple modifications you can explore:
– Flour type: You can opt for different kinds of flour to adjust the texture and flavor of your bread. For instance, try using bread flour to create a chewier, crustier loaf or swap out some all-purpose flour for whole wheat flour to make a heartier bread. You could also experiment with rye flour to give your coffee bread a slightly tangy taste.
– Sweeteners: While sugar is the recommended sweetener in this recipe, you can use maple syrup, honey or agave nectar instead. Keep in mind that the end result might be slightly different, depending on what sweetener you use.
– Milk: Any kind of milk—almond, soy or coconut—will work in this recipe.
– Mix-ins: For an added twist, consider mixing in dried fruit, nuts or chocolate chips into the batter before baking.
– Shape and size: If you don’t have coffee cans on hand, bake the batter as a regular loaf in a loaf pan. You could even shape it into buns for sandwiches.
– Adding yeast: Want to up your yeast bread-making game? Add 1 tbsp of active dry yeast into the recipe when mixing liquid with dry ingredients.
The possibilities are endless when it comes to experimenting with this coffee bread recipe! Have fun and get creative by testing out these substitutions and variations to make an even more delicious homemade bread.
Serving and Pairing
Now that you have a freshly baked coffee bread in your hands, it’s time to talk about how to serve and pair it. This delicious bread is versatile and can complement various flavors and textures.
One way to enjoy this coffee bread is by slicing it into thick pieces and serving it with butter or jam. The warm and crusty interior of the bread perfectly contrasts with the smooth texture of the butter or the sweet flavor of the jam. You can also toast the slices to give them extra crunch.
Another option is to use the coffee bread as a base for your favorite sandwiches. The bread’s mild sweetness adds a unique dimension to savory fillings such as ham, turkey, or cheese. You can also experiment with toppings like sliced tomatoes, lettuce, or avocado.
Coffee bread also pairs well with soups and stews. Its sturdy texture holds up well when dunked in liquid without falling apart, making it an excellent companion for hearty meals. It’s perfect for mopping up any remaining broth or gravy left in your bowl.
When it comes to drinks, coffee bread pairs well with hot drinks such as tea or coffee, as well as milk, hot cocoa, or cider. If you’re feeling fancy, you can even turn your coffee bread into French toast by dipping slices in a mixture of beaten eggs and milk before frying them in a pan.
In conclusion, this homemade coffee bread is an excellent addition to any meal or snacktime. Serve it warm with butter or jam, use it as sandwich bread, or pair it with soups and stews for a wholesome meal. There are endless possibilities for enjoying this versatile and flavorful bread.
Make-Ahead, Storing and Reheating
When it comes to making bread, there’s nothing quite like the smell of a freshly baked loaf. However, sometimes we just don’t have the time or energy to whip up a batch of homemade bread each and every day. Luckily, with this white bread baked in a coffee can recipe, you can easily make-ahead and store this delightful bread for later use.
Making ahead is simple with this recipe, as it is essentially a baking soda-leavened quick bread. The unusual cooking method of baking the bread in coffee cans allows for easier storage than traditional homemade yeast bread making. Once fully cooled, you can wrap the bread in plastic wrap or aluminum foil before storing it in an airtight container.
If you plan on eating the bread within the next few days, simply leave it at room temperature on your counter. However, if you want to save it for longer periods of time, you should store it in your refrigerator. The taste and texture is equally as good both ways. In fact, many people prefer their homemade quick breads cold, because they get even better over time.
Reheating this bread when stored at room temperature or in the fridge is pretty simple-just place it in the oven at 350°F until it’s crusty and golden brown again, which usually doesn’t take more than 10 minutes. While reheating this bread will never quite recreate that freshly baked aroma and soft texture that the first time experience delivers. But by following these steps, you can enjoy your homemade crusty loaf to its fullest potential for days or weeks after baking.
In short, this homemade white velvet batter bread is a versatile staple that can be made days ahead of time and stored away without losing any flavor or texture. Whether warm and fresh or cold from the fridge, this baked coffee cans variation of our coffee bread recipe remains an incredible treat either solo or paired with butter or peanut butter and jam spread on top.
Tips for Perfect Results
To make sure your white bread baked in a coffee can comes out perfect every time, follow these tips:
1. Proper Greasing: Make sure to coat the inside of your coffee can with cooking spray or oil and some flour to avoid sticking when removing the bread from the can.
2. Don’t Skip Pre-Heating: Before putting the batter in the coffee can, preheat the oven accordingly. This will help the bread rise evenly and will result in a beautiful golden crust.
3. The Right Temperature: For white bread to bake perfectly, it needs to be baked at 350°F for around 45 minutes or until there is a hollow sound when tapping the bottom of the can.
4. Test Your Yeast: If you’re not sure your yeast is active or not, then dissolve one tablespoon of sugar in warm water and sprinkle active dry yeast over it. Wait for 10 minutes for bubbles to form and rise to make sure yeast is working.
5. Sift Flour: Sift flour before mixing with other ingredients in order to create a lighter, fluffier bread.
6. Measure Accurately: To achieve well-balanced consistency, measure all wet ingredients (such as milk and water) and dry ingredients (such as flour and sugar) with precision.
7. Mix Thoroughly: Make sure all ingredients are mixed thoroughly before putting them into the coffee can to bake.
8. Don’t Open The Oven Door Early: While you may be tempted to check on the bread, opening the oven door too early or too often could cause the bread to deflate or lose its shape.
Following these tips will ensure that your white bread baked in a coffee can recipe will turn out beautifully every single time.
FAQ
As we wrap up this recipe article, it’s time to answer some frequently asked questions about this white bread baked in a coffee can recipe. So, without any further ado, let me address some of the most common queries that might be running through your mind.
Can you bake in a coffee can?
According to verified sources, baking in coffee cans is considered a secure practice that one can opt for. This was confirmed by the Canned Food Information Council in a statement dated January 12, 1989.
What bread is baked in a can?
When making Boston brown bread, the cooking technique is quite different from other quick breads. Instead of baking, this bread is steamed. To achieve this, the batter needs to be added into greased cans, typically coffee cans, and then covered with either parchment paper or foil. The cans are then tied with string to secure the covering, and set inside a pot with about an inch or two of water.
What makes bread lighter and fluffier?
When yeast grows, it produces gas which is responsible for the bubbles in bread, resulting in a lighter and fluffier loaf. The gas created as yeast grows, namely carbon dioxide, causes holes to form in the dough. This is why it’s important to let your bread dough rise properly, allowing the yeast to grow and produce enough gas to make your bread soft and airy.
What does adding milk instead of water do bread?
When it comes to baking bread, adding milk to the recipe can offer some distinct benefits. For one, the milk fat content in the milk will contribute to a softer and more tender texture in the finished loaf. Moreover, the lactose or milk sugar in the milk will caramelize during baking, which can result in a richer and tastier bread. Additionally, bread dough made with milk will brown more easily than dough made with water.
Bottom Line
In conclusion, the White Bread Baked in a Coffee Can is an unusual yet perfect baking method to create a loaf of white velvet batter bread that is crusty on the outside and fluffy on the inside. You will love the simplicity of using coffee cans to make bread dough that fits perfectly into them. The recipe uses readily available ingredients, making it an affordable home baking option.
Moreover, this bread recipe provides several substitutions and variations so that you can customize it to your liking by either including brown sugar or self-rising flour or making it a pumpkin bread recipe. Also, the homemade bread could be served as a side dish with your favorite dinner menu or toasted and spread with jam for breakfast.
So, what’s stopping you from trying out this method the next time you feel like baking? With tips for perfect results such as preheating the oven and greasing the coffee cans well, this bread recipe becomes a lot easier than expected for even those who are not familiar with yeast bread making. In conclusion, be prepared to enjoy Baked Coffee Cans 1-2-3’s lighter and fluffier version of Boston Brown Bread or Rye Bread that tastes as great as it looks!
White Bread Baked in a Coffee Can Recipe
These recipes were in my local paper a few weeks ago and looked to be really good. I’m afraid that I did not keep the name of the person sending this in to the paper. White Bread Baked in a Coffee Can You will need 1 pound coffee cans these breads.
- 4 -4 1/2 cups all-purpose flour, sifted
- 1 package active dry yeast
- 1/2 cup milk
- 1/2 cup water
- 1/2 cup vegetable oil
- 1/4 cup sugar
- 1 teaspoon salt
- 2 eggs
- Sift flour onto piece of waxed paper. Measure 1-1/2 cups of this flour into a large bowl; stir in yeast.
- In saucepan, place milk, water, oil, sugar and salt. Set over low heat and heat only until warm, stirring to blend.
- Add liquid ingredients to flour and yeast in bowl and beat until smooth.
- Blend in eggs.
- Add enough additional flour to make a stiff batter, beating until smooth and elastic. Spoon batter into 2 well-greased 1-pound coffee cans.
- Cover with plastic snap-on lids and place in a warm spot for dough to rise.
- When dough has almost reached top of cans, about 1 hour, remove lids and bake at 375 F. for 35 minutes or until bread is high and well-browned.
- Let cool in cans for 10 minutes before turning out on rack to cool completely.
[custom-related-posts title=”Recommended Recipes Just For You” none_text=”None found” order_by=”date” order=”ASC”]